Hi,
Didn’t find an article about this, so I decided to gather the pieces and put them in one place.
First little bit of background.
You have Azure AD and on-premises or cloud-based application that you want to allow SSO to, but you also have roles that you want be automatically sent to application.
Sounds familiar? Then read the following or nevermind, read it anyway, god mode stuff.
What is enterprise application and Microsoft app gallery
Enterprise applications are application that you can single sign-on from Azure AD to.
There are these options available:
- Enterprise application from the the gallery
- Enterprise application as a non-gallery app.
- On-premises application (with Application Proxy)

These are the three basic configuration options. So, lets open these up a bit.
In a Microsoft evergreen service there is insane amount of new features coming almost weekly. And that trend also works with Application that Microsoft adds to the gallery of application they directly support.
Microsoft has seen ridiculous growth in Azure AD App Gallery usage during Covid.
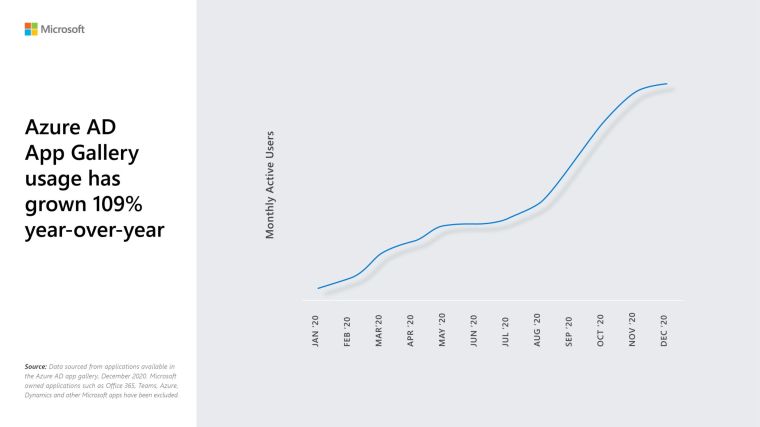
And they released the top Apps used by this function. ServiceNow is on the top every single year.

Currently there is over 1956 applications in the application gallery. Numerous others can be used with SAML-based authentication and accessed from https://myapps.microsoft.com portal.
Microsoft support Google and Amazon service SSO with their identit.

How register Enterprise Application and modify Manifest
When add an enterprise app, you have to choose the origin. Like I said before, there is three major categories.


You can choose from on-premises applications thru App Proxy (Different discussion as there is some differences depending on the app) and then there is from the app gallery on non-gallery.
For my example I will choose non-gallery and In this demo I will call my demo, well just demo.
So go and create your app.

There you will find the options above. I will not be covering them all, just opening up SSO and Self-Service and what is the difference with Enterprise app and App registration.
First Single Sign-On. There is an options for SAML, which I will cover in this blog.
The different types SSO’s are explained here https://docs.microsoft.com/en-us/azure/active-directory/manage-apps/configure-password-single-sign-on-non-gallery-applications

When you open SAML, you will see the following page.
In this page you can define the metadata for the request. Either manually entering or updating via federation XML file that has the rights attributes from the destination app.
You can give claims to be transferred. If you have user that has username with something different than their email address, you could user emailaddress attribute. There are the sames one that you on in your AD or Azure AD. It really depends on the destination app and what it prefers.
When you create the federation between system, you have to download the certificate in the mode that the destination understands it and you have to do it every single time you update the config as it will need to be re-generated.
When you done, you will download your own federation metadata and send it to app provider to federating their end.
After all you can test the SSO from this single panel, it will give you debugging info if something goes sour.

So, now you have federation in place. Then with the manifest, but first the differences between Enterprise App and App Registrations.
This was opened from a Microsoft employee in the forums https://docs.microsoft.com/en-us/answers/questions/270680/app-registration-vs-enterprise-applications.html
“The Application Object is what you see under App Registrations in AAD. This object acts as the template where you can go ahead and configure various things like API Permissions, Client Secrets, Branding, App Roles, etc. All these customizations that you make to your app, get written to the app manifest file. The application object describes three aspects of an application: how the service can issue tokens in order to access the application, resources that the application might need to access, and the actions that the application can take.
The Service Principal Object is what you see under the Enterprise Registration blade in AAD. Every Application Object (created through the Azure Portal or using the Microsoft Graph APIs, or AzureAD PS Module) would create a corresponding Service Principal Object in the Enterprise Registration blade of AAD. A service principal is a concrete instance created from the application object and inherits certain properties from that application object. A service principal is created in each tenant where the application is used and references the globally unique app object. The service principal object defines what the app can actually do in the specific tenant, who can access the app, and what resources the app can access.”
Then to Manifest.
With manifest you can manipulate the attributes sent to destination app. There is a json-file that you can edit.
But first you need and Unique GUID, doesn’t have to be anything considering your app, just unique.
You can create a unique GUID with powershell
[guid]::NewGuid()
or if you prefer to use GUID generator from the web, just search, there is a lot of them.
So, GUID looks like this.

And every single time you generate new it will be different. Then you go to Azure Active Directory and choose App registrations.

And your freshly configured app.

And Manifest.

Under manifest you find the json file, I like to edit json’s in Visual Studio Code as you lot’s of plugins to provide the necessary support for whatever you are editing.
If you mess up your json, there is no turning back so download it first so you have an backup.

Copy paste to Visual Studio and find the part that says AppRoles

In the AppRoles copy one block and modify based on your needs.
In my demo I created a role called Demo_Role and here is the part you need the Unique GUID

And also add your wanted role to Value field like above.
Then copy paste the json back to online editor and save. If the modification are correct, you will get a popup saying

Then go backup Enterprise applications and find your app.
And choose Assign user and Roles.

Choose Add user / Group and find the user or group that you need to assign the app role.
Note! Nested groups cannot be used, but dynamic groups will work.
Here is my article on how to create Dynamic Groups.


After all this you have a user / users that can send an Application Role to the destination app with their login claims.

After this one you can enable Self-service if needed.
With Self-service you can provide user to request access to an app and use Access reviews to govern the groups. Nice feature.

Self-service concept is also present in one of my post before about Entitlement Management
 RSS - Posts