Table of Contents
So what is Azure ARC?
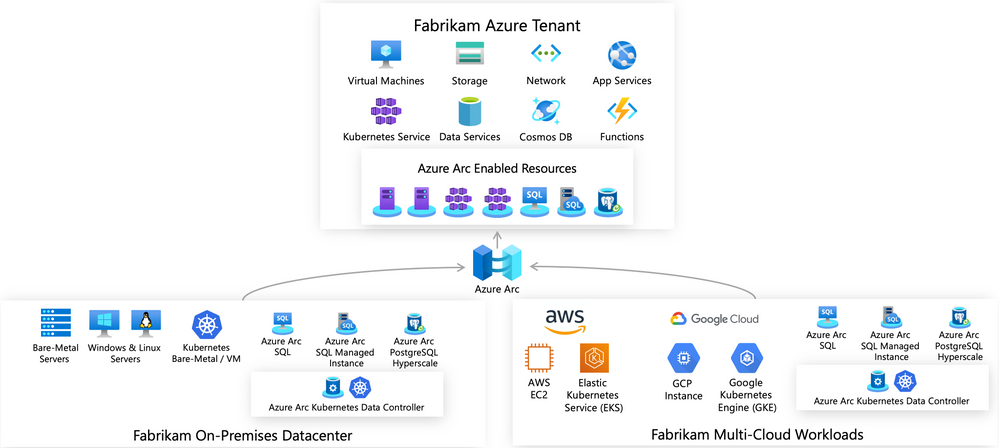
Azure ARC was first introduced at Ignite 2019. Azure ARC enables you to manage servers in different realms no matter in what AD it is. It will allow you to use Azure Resource Manager templates though out your environment.
In the following diagram you see the components it uses.
How it works?
You will install and agent to machine you want to manage.
- Windows agent Windows Installer package from the Microsoft Download Center.
- Linux agent package is distributed from Microsoft’s package repository using the preferred package format for the distribution (.RPM or .DEB).
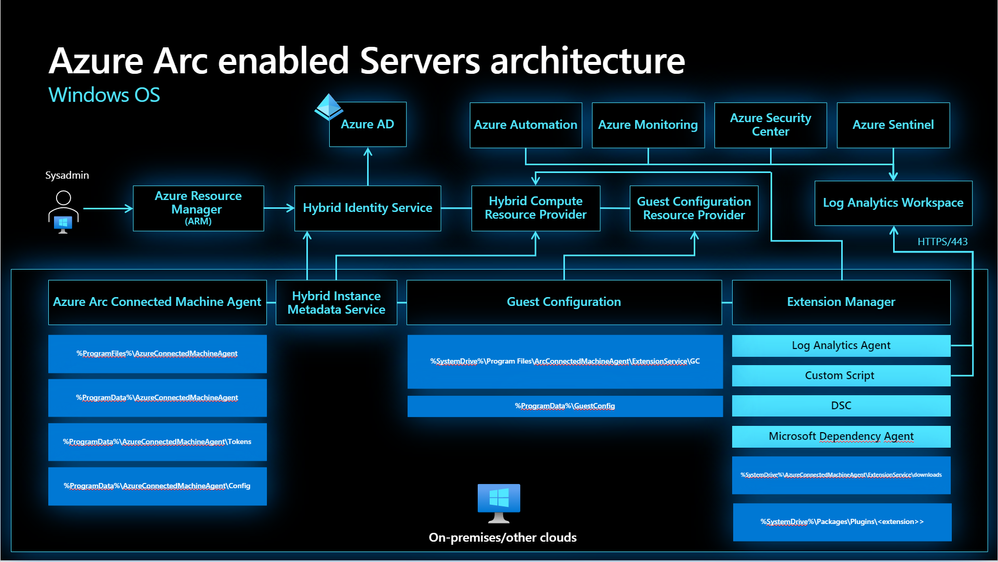
Agent flow described in the following diagram.

Supported operating systems
The following versions of the Windows and Linux operating system are officially supported for the Azure Connected Machine agent:
- Windows Server 2008 R2 SP1, Windows Server 2012 R2, 2016, 2019, and 2022 (including Server Core)
- Ubuntu 16.04, 18.04, and 20.04 LTS (x64)
- CentOS Linux 7 and 8 (x64)
- SUSE Linux Enterprise Server (SLES) 12 and 15 (x64)
- Red Hat Enterprise Linux (RHEL) 7 and 8 (x64)
- Amazon Linux 2 (x64)
- Oracle Linux 7
The following metadata information about the connected machine is collected and stored in the region where the Azure Arc machine resource is configured:
- Operating system name and version
- Computer name
- Computer fully qualified domain name (FQDN)
- Connected Machine agent version
Azure subscription and service limits
Before configuring your machines with Azure Arc-enabled servers, review the Azure Resource Manager subscription limits and resource group limits to plan for the number of machines to be connected.
Azure Arc-enabled servers supports up to 5,000 machine instances in a resource group.
Network traffic to Azure ARC
Service Tags:
- AzureActiveDirectory
- AzureTrafficManager
- AzureResourceManager
- AzureArcInfrastructure
- Storage
URLs:
| Agent resource | Description |
| management.azure.com | Azure Resource Manager |
| login.windows.net | Azure Active Directory |
| login.microsoftonline.com | Azure Active Directory |
| dc.services.visualstudio.com | Application Insights |
| *.guestconfiguration.azure.com | Guest configuration |
| *.his.arc.azure.com | Hybrid Identity Service |
| *.blob.core.windows.net | Download source for Azure Arc-enabled servers extensions |
Azure resource providers
Azure Arc-enabled servers depend on the following Azure resource providers in your subscription in order to use this service:
- Microsoft.HybridCompute
- Microsoft.GuestConfiguration
If they are not registered, you can register them using the following commands:
Azure PowerShell:
|
1 2 3 4 5 |
<code>Login-AzAccount Set-AzContext -SubscriptionId [subscription you want to onboard] Register-AzResourceProvider -ProviderNamespace Microsoft.HybridCompute Register-AzResourceProvider -ProviderNamespace Microsoft.GuestConfiguration |
Azure CLI:
|
1 2 3 |
<code>az account set --subscription "{Your Subscription Name}" az provider register --namespace 'Microsoft.HybridCompute' az provider register --namespace 'Microsoft.GuestConfiguration'</code> |
Windows agent installation details
The Connected Machine agent for Windows can be installed by using one of the following three methods:
- Double-click the file
AzureConnectedMachineAgent.msi. - Manually by running the Windows Installer package
AzureConnectedMachineAgent.msifrom the Command shell. - From a PowerShell session using a scripted method.
Linux agent installation details
The Connected Machine agent for Linux is provided in the preferred package format for the distribution (.RPM or .DEB) that’s hosted in the Microsoft package repository. The agent is installed and configured with the shell script bundle Install_linux_azcmagent.sh.
Onboarding machines to Azure ARC
Generate installation script
The script to automate the download, installation, and establish the connection with Azure Arc, is available from the Azure portal. To complete the process, do the following:
- Launch the Azure Arc service in the Azure portal by clicking All services, then searching for and selecting Servers – Azure Arc.

- On the Servers – Azure Arc page, select Add at the upper left.
- On the Select a method page, select the Add servers using interactive script tile, and then select Generate script.
- On the Generate script page, select the subscription and resource group where you want the machine to be managed within Azure. Select an Azure location where the machine metadata will be stored. This location can be the same or different, as the resource group’s location.
- On the Prerequisites page, review the information and then select Next: Resource details.
- On the Resource details page, provide the following:
- In the Resource group drop-down list, select the resource group the machine will be managed from.
- In the Region drop-down list, select the Azure region to store the servers metadata.
- In the Operating system drop-down list, select the operating system that the script be configured to run on.
- If the machine is communicating through a proxy server to connect to the internet, specify the proxy server IP address or the name and port number that the machine will use to communicate with the proxy server. Enter the value in the format
http://<proxyURL>:<proxyport>. - Select Next: Tags.
- On the Tags page, review the default Physical location tags suggested and enter a value, or specify one or more Custom tags to support your standards.
- Select Next: Download and run script.
- On the Download and run script page, review the summary information, and then select Download. If you still need to make changes, select Previous.
Install the agent using the script
Windows agent
- Log in to the server.
- Open an elevated 64-bit PowerShell command prompt.
- Change to the folder or share that you copied the script to, and execute it on the server by running the
./OnboardingScript.ps1script.
Linux agent
- To install the Linux agent on the target machine that can directly communicate to Azure, run the following command:BashCopy
bash ~/Install_linux_azcmagent.sh- If the target machine communicates through a proxy server, run the following command:BashCopy
bash ~/Install_linux_azcmagent.sh --proxy "{proxy-url}:{proxy-port}"
- If the target machine communicates through a proxy server, run the following command:BashCopy
Enabling Azure Defender
When you have enrolled the devices to Azure ARC you can choose a resource group which has Azure Defender for Servers plan enabled.

When you add servers to that resource group they can use Azure Defender for Servers thru Azure ARC Agent installed before.


And finally you can see them inside Azure ARC servers and can access their details.

Whats new and coming
Closing time
Azure ARC is really amazing feature that gives you control of servers no matter where they are. There is new features coming to ARC almost monthly.
If you have and Hybrid environment consisting of multiple servers in different networks and locations it will efficiently offer you a way to manage them with one resource group and it’s features.
 RSS - Posts