Your organization has different kind of files. User personal files, patent pending studies, agreements, receipt, applications, copies of super duper secret documents scattered all over and you don’t even where.
These a risk of leaking those documents externally either by mistake or knowingly doing so.
You send internally something that you wan’t to be printed, forwarded or saved.
There is multiple scenarios why you should label your files and let them call home once in a while if you share them outside the organization.
That’s the why and then to the how.
How to do sensitivity labeling?
Create a new label from Information protection.

You can choose files & emails but also groups and sites. You can actually but a default sensitivity label to a Teams channel when they are created by using templates.

And you can choose to put header, footer and / or watermark to the content. This could be useful if you want to stamp the content with public or secret info.

Next you have couple of options, either let users apply label to the content or apply the content forcibly.


You can apply the label automatically to all content, put expiration date to user, allow offline access for certain amount of days and allow certain users or groups to interact with protected content
Or then you can let users to apply the label and enforce email encryption and forwarding.
Double Key Encryption (DKE) is a way to encrypt content with our on-premises RMS infrastructure if you want, with this options Microsoft doesn’t have access to dke keys so you have to take care of the keys and the infra, if you loose those keys, you loose the files.
Then you can put header, footer or a watermark to the content.

And do auto-labeling to the content with rules. I will cover this one later in this post.

You can also force compliance with Conditional Access directly from the label to sites and groups.


You can force SPO sites and therefore Teams Channel to be used the way you want.


Nice that you can force these settings with a label application to the sites and M365 groups.
And then apply conditional access to the same sites and groups, example for unmanaged (not compliant devices) you can force only web access, how easy is that. Just bare in mind that these settings will overtake the ones in SharePoint and Teams.

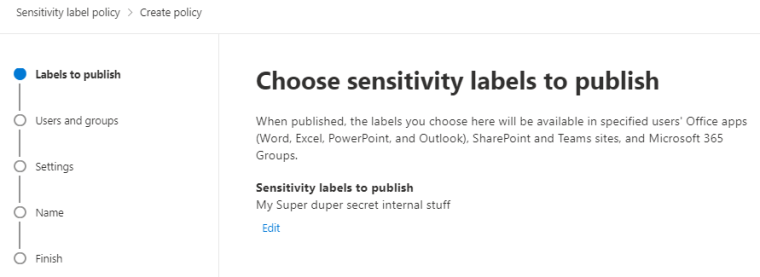
Then you have to publish the label for it to be available to users.
You can add justification for users to lower or remove the label. And to force users to apply the sensitivity label.
It’s also wise to create a custom help page for organization to use. With info how to use the labels and why, who to contact when in need etc.

Apply the label as default for content, emails and sites and groups.

And were done. Now we have our super duper secret label available for users. But it can take 24hrs for the users to see the policy. Always there is a time for the changes, just like it was in the retention policies.

Auto-labeling
With auto-labeling you can define triggers to find data that needs to be protected. You can example create GDPR based policy from Microsoft predefined rules or create your own.
I will go with my own.

Choose the location, I will use SPO and EXO for my example.

Within the Exchange policy there is the same rules than with transport rules you can set inside EXO admin center.

And with SPO you can choose example the European predefined rules for sensitive content.

And wait a sec, you cannot apply the label to SPO sites when it contains EXO specific actions.

Just wanted to make this step so everyone understands what kind of limitation there is for applying the label to multiple locations.
So if you want to apply a label to SPO and O4B content, you have to create own label for that content as you cannot apply the same label to emails and libraries.
and finally you will keep the auto-label policy Turned off or Run it in simulation mode.
In simulation mode it will find the content that will be protected and when this crawl finishes you can enable the policy.
And every time you make a change you have run simulation again.

And were done here.

Final sayings
With Azure Information protect you can force the content to be protected but also force the user to share only for external users that you want.
Conditional Access integration is really great feature that should be used in many occasions.
With AIP you don’t let your precious super duper secret documents to go to the wrong hands.
In the next part I will be explaining Data Loss Prevention usage.
Until that time,

 RSS - Posts