Table of Contents
What Is AIP scanner?
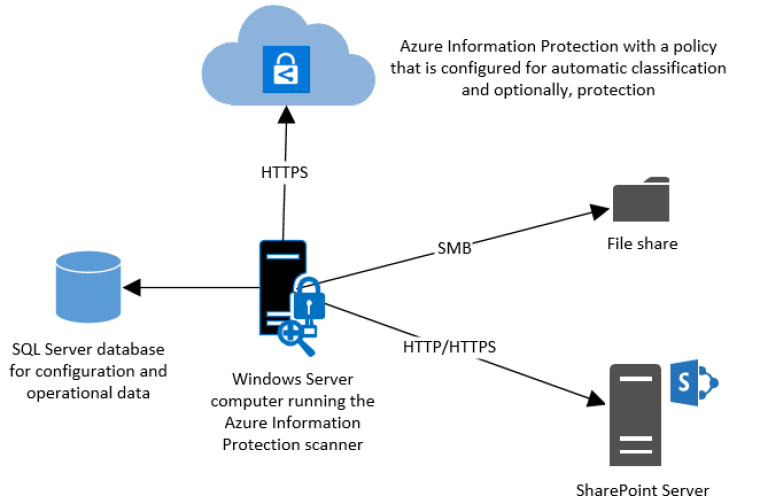
Azure Information Protection Scanner is combination of Azure Information Protection Viewer, SQL DB and Azure App registration.
It will discover the data from File shares, SharePoint content and it also has a network discovery functionality (that I will not be covering in this post)
Installation prerequisites
https://docs.microsoft.com/en-us/azure/information-protection/deploy-aip-scanner-prereqs
Read them thru, not going to explain every single detail but I will provide a combined cheat sheet on what needs to be put as notes and how to use them.
SQL installation
SQL Express 2019
https://www.microsoft.com/en-us/download/details.aspx?id=101064
SQL Management tools
SQL version Note! Express only for testing, which I will now do.


Next, next, next and done.
Quick tip!
If to want to limit SQL Server memory consumption, it can be done with management studio. Do restart of services needed but preferred.

Installing the AIP Scanner
And choose what you needed. You can use the Public Preview also for testing purposes but for this scenario we need the

Create a label (Mandatory)
Create at least one label for testing purposes. Recommended to use automatic rules or selecting info types to discovered-all


Create the content job to Azure

Choose Enforce is off for discovery purposes.
Specifies whether the scanner only logs the files that meet the conditions you’ve specified without applying the corresponding label (the installation default setting), or applies the label:
Off: Scans the data repositories in the “what if” mode, to log results only, without setting the classification or protection that the corresponding label would apply.
On: Scans the data repositories, and for files that meet the conditions, apply the corresponding label to set the classification and optionally, protection

And Treat recommended labeling as automatic to Off


Create a share if don’t have any (Probably you have if you need to scan those files inside)
Quick tip!
Never ever user EVERYONE shares. It means everyone even the NOT authenticated users.

Instead use Authenticated users.

Quicktip!
You can get shares with Get-SmbShare command. So there is our victim share.

Add the repository


Assigning the Content scan job to a Cluster


Optionally you can also create a network scan job but not required. Network scan job can find shares and content from different sources in networks that the AIP scanner has access to.

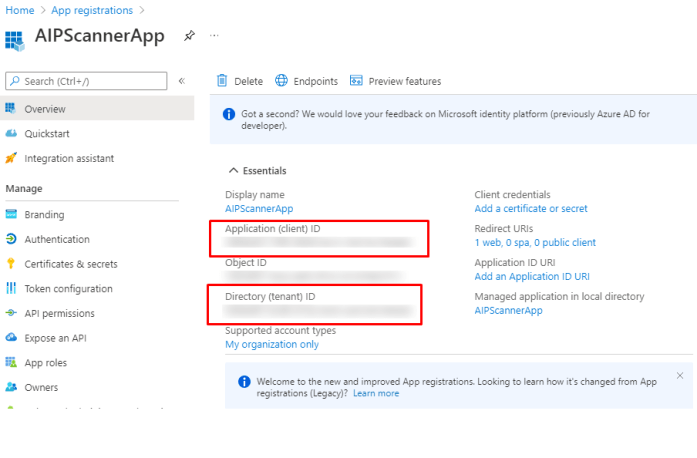
Registering the app to Azure App registrations
Then to the fun part, App registrations.


Choose a name and Accounts in this directory.

Note down Application ID and Tenant ID

You will choose how long the secret will be valid.

Copy the password to your documentation, after you close the page it will not be visible anymore.

hit refresh and you will see the registration.

Adding permissions to API interface


For testing purposes I will also select Super User rights

What is a Super User in AIP you ask, this is what.


Now you should having this and then Grant Admin consent for you tenant.


And all is fine and dandy

Provisioning the DB, installing agent and connect to Azure AD
One all the Cloud stuff is done you will go to the server that will be hosting be scanner.
And run the following

Connect to app registration.

Check the scanner install and connection to Azure

and you can see the scanner from Azure portal.


you will see notification for scanning job starting soon.


Quick tip!
In scanner version 2.7.101.0 and lower, you may want to refresh the policy sooner than every four hours, such as while testing. In such cases, manually delete the contents of the %LocalAppData%\Microsoft\MSIP\mip<processname>\mip directory and restart the Azure Information Protection service.
If you’ve also changed protection settings for your labels, wait an extra 15 minutes from when you saved the updated protection settings before restarting the Azure Information Protection service.
Location of results
Logs are also stored locally in the %localappdata%\Microsoft\MSIP\Scanner\Reports directory on the scanner machine, and include:
| Type | Description |
|---|---|
| .txt summary files | Includes the time taken to scan, the number of scanned files, and how many files had a match for the information types. |
| .csv detail files | Contains detailed descriptions for each file scanned. The directory can hold up to 60 reports for each scanning cycle. |

And you done.
Finalizing the post
There you go, AIP scanner installation and usage instructions. After this one you can use the information gathered to create preferred labels and policies for your content.
But that is a content of a different blog post.
The custom made notebook for the deployment tasks is below. Added all the information needed as variables so change accordingly.
|
1 2 3 4 5 6 7 8 9 10 11 12 13 14 15 16 17 18 19 20 21 22 23 24 25 26 27 28 29 30 31 32 33 34 35 36 37 38 39 40 41 42 43 44 45 |
# Notes for the deployment $Cluster = name of you cluster that you created $LocalShare = "FQDN Unc path to your local Share" $Appname = AIPScannerApp $WebURI = https://localhost $AppId = "" $AppSecret = "" $Tenantid = "" # Rights needed for the API in Azure # Azure Rights Management Services # Content.DeletegatedReader # Content.DeletegatedWriter # Content.SuperUser (Optional) # Microsoft information Protection Sync Service # UnifiedPolicy.Tenant.Read # Accounts for the deployment $ServiceAccounts = Local Share access account $DelegatedUser = "Azure AD user having rights to access API" # SQL instance $SqlInstance = Name Of your SQL Instance that AIP will be provisioned to # Optional for network discovery # Share Admin(AD) # Share User (AD) # Installing agent # Service account is the Local account that will used for service $ServiceAccount = get-credential # Install AIP Scanner Install-aipscanner -SqlServerInstance $SqlInstance -cluster $cluster -ServiceUserCredentials $ServiceAccount #Set authentication with Azure AD App Set-AIPAuthentication -AppId $appid -AppSecret $appsecret -TenantId $tenantid -DelegatedUser $deletegateduser -OnbehalfOf $ServiceAccount |
Once done, verify the agent installation
|
1 2 3 |
# Verify agent install: Start-AIPScannerDiagnostics -OnbehalfOf $ServiceAccount |

 RSS - Posts